House Construction
An Up-to-Date Picture
02/17/10 10:30 PM
Hey all!
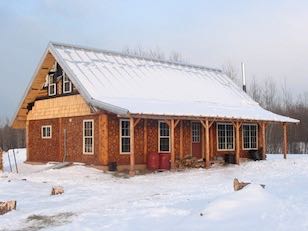
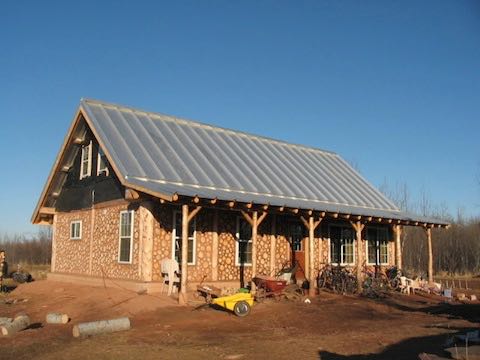
This blog is pretty dead now, but since a lot of people still read the housebuilding archives I thought I should post a more recent picture of the place. It's been a few winters now and it's still keeping us warm!
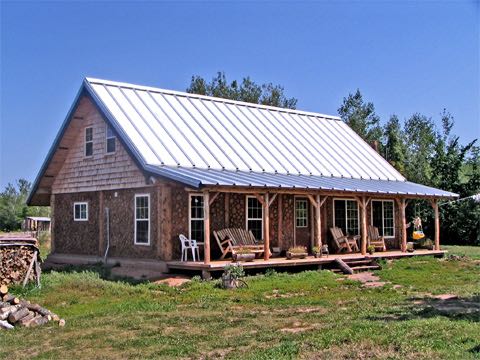
Anyway, there you go!
Have a blessed day!
This blog is pretty dead now, but since a lot of people still read the housebuilding archives I thought I should post a more recent picture of the place. It's been a few winters now and it's still keeping us warm!
Anyway, there you go!
Have a blessed day!
Comments
Living in Our New House
01/12/08 08:09 PM
I'm loving living in a cob/wood house with an earthen floor, earthen bathtub, rocket stove with cob bench and a cold room.
The house feels plenty roomy to me... 1300+ sq ft goes a long way when you design it yourself to put the space exactly where you need it. I actually feel quite spoiled and pampered in here, with the high ceilings and big, deep windows. After 15 years of mobile homes, it just feels so foreign to me, as do the solid, sound proof walls. The floor to the kids' room is not sound proof, however, so we really have to watch our night time conversations... they love to hear us talking about them at night
The cold room is working well as a walk-in cooler in place of a refrigerator. I don't have to do anything with the vents unless the lows are going down to negative numbers at night... there were only a couple of nights like that so far, and I didn't think of closing the vents, so the potatoes that were right near the vents froze. So far, that's the only loss, and was my own fault. Keeping food away from the vents seems to be sufficient to keep things from freezing (though I will try to remember to close them when we get our bitter cold season... IF we get our bitter cold season). I have the few frozen things that I had out in coolers outside, and that has been fine, even with the recent January thaw. Andrew is talking about rigging a cold water cooler for the summer, based on the Amish principle of using cold water from the pump, only ours will come from our well... that would give me the extra "cool" that I need for milk and a few other things, and the cold room would hopefully suffice for everything else in the warmer months. We eat most things fresh then, anyway.
The cracks in the floor were nowhere near the problem that I had feared. None have pulled up or worsened, and most "healed" with the oiling. The floor feels wonderful and it's very easy to clean and maintain. The only negatives are that it is quite soft, and dents easy, and the area in the mudroom takes quite a beating during the really snowy times, when kids are hanging snow covered snowsuits and boots back there. It's ok if I remember to wipe it down with a towel, but otherwise it gets soft and the very top layer can buckle. (We have a very thin top layer that acts like a laminate... the floor itself remains intact, but it's that top layer that can peel or dent easily... it's because of the weird way that we ended up having to do it, so I don't think that a normal earthen floor would have those problems.) Anyway, all in all I love the floor and never want to change it. It feels healing and soft to me, and I love going barefoot. It's especially nice that we have it heated in the living room, and I would highly recommend that. It's cooler in the bedroom, but not cold and clammy like concrete. Here's a pic of the girls making the garland that shows the living room floor:

The house is staying a very even and comfortable temperature with the rocket stove heater. People are amazed when they visit in the afternoon and feel how warm and cozy it is in here, with the bench still warm, and we tell them that we haven't had the stove on since the previous night. With typical wintertime temps of highs in the upper twenties, we usually run it 8-10 hrs/day. That not only supplies our heat but all of our hot water. We are getting good at timing it and keeping showers short. The hot water tank holds the hot water even when the oven is off, so, for example, this morning we were able to run 3 comfortably hot showers and still had hot water to spare for dishes from the previous night.
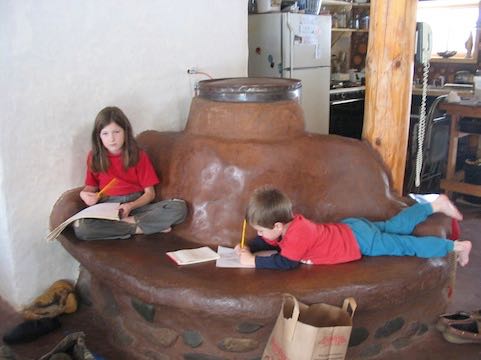
Without a doubt, my very favorite feature of the house is the cob bench. I never imagined how much I would LOVE the bench. I love everything about it, the way it feels, the way it looks, the way it makes me feel, how easy it is to clean and maintain... you really have to experience the bench to appreciate it. Here's a pic of the kids "feeling at home" on their cob bench:
I also love the smell of the house. It's fresh and earthy and woodsy all at once. I hope the smell never changes.
Taking a shower in the cob tub is like bathing in mountain stream, without fear of onlookers and leaches
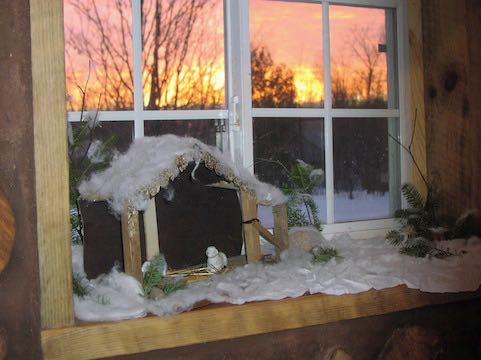
I loved the way the girls decorated the house for Christmas, and I am really going to miss the tree and the nativity scene. The house seems to have been made for them. Here is a picture of us waiting for Jesus, with the "Sun" coming up in the East in the background.

Getting Ready to Move In!
09/21/07 12:04 PM
Wow, where did the summer go? I have to say that I enjoyed the work on the house more last summer than this, as last summer it was all out in the open air, stomping the cob and putting up the walls. This summer was a lot of experimenting with different paints and plasters, and the kind of detail work that I'm not particularly fond of. It was very comfortable working inside the house throughout the summer, however. It was always cool, and sitting on the rocket bench was especially refreshing after some outside work on a hot day. We fired up the rocket stove on one cool day in September, and it quickly warmed everything up. With only an hour or so of running, it was cozy in there for 2 days. We are all getting very anxious to experience life within the walls that we built with our own hands out of mostly materials from our own land. We are also looking forward to this project being finished, so that we can start or continue work on so many other homestead activities that we have planned.
The cob mortar has held up very well through its first year, especially considering that it was left exposed without a roof for much of last summer, while it was still fresh. It wasn't our intention to do things that way, but it's how it worked out. Despite the abuse, the cob mortar showed very little wear. We patched shrinkage cracks with clay/sand/manure/hemp oil and then oiled the whole exterior this summer with hemp oil. A few logs were loose so we tightened them with shims and patched gaps as well. Adding hemp oil to the patch mix really makes the patches stick like glue. I have patched some floor with the same mix with great results as well.
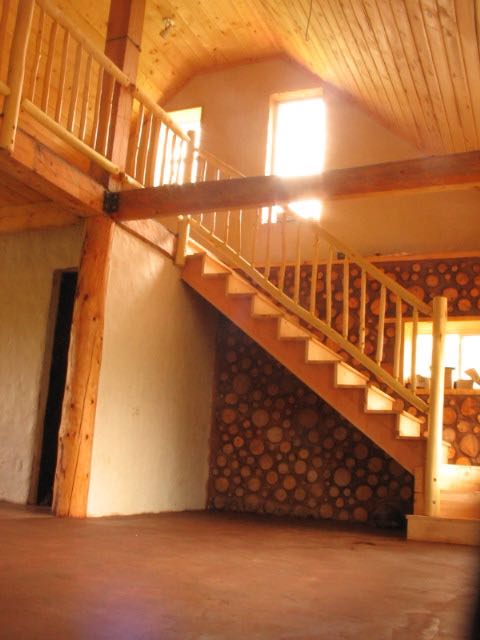
Living room and loft view from front door. Earthen floor after 3 coats of hemp oil.
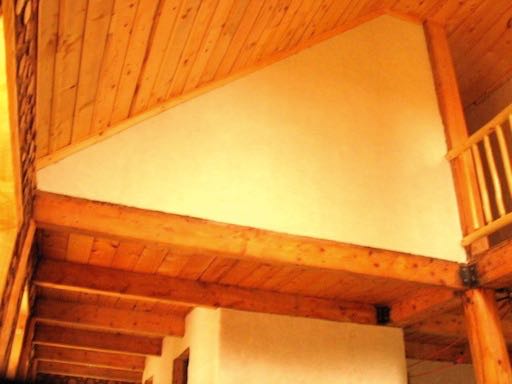
Wall above rocket stove.
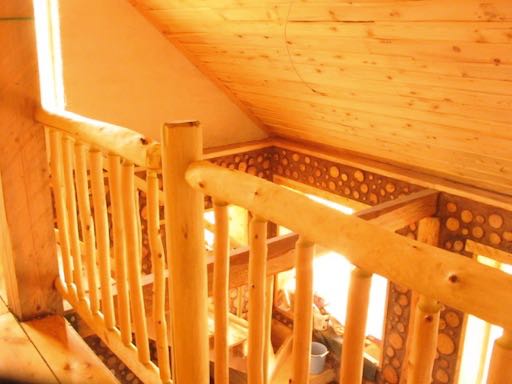
Looking down at staircase from loft.
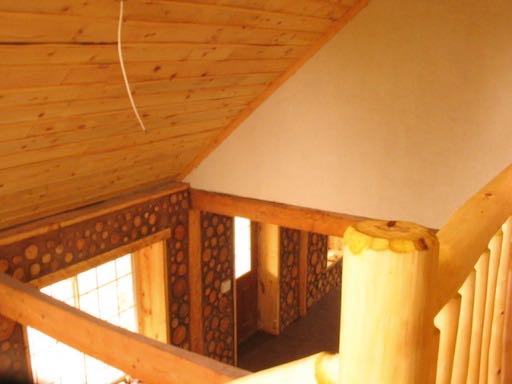
Looking down into living room from loft.
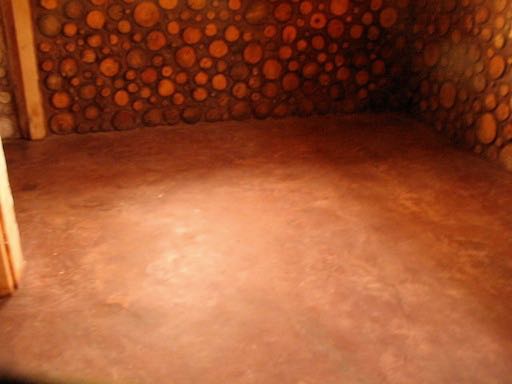
Earthen floor in master bedroom (4 coats of hemp oil applied, experimented with waterglass in this room as a precoat prior to oiling, will get one more coat of oil and one more oil/beeswax).
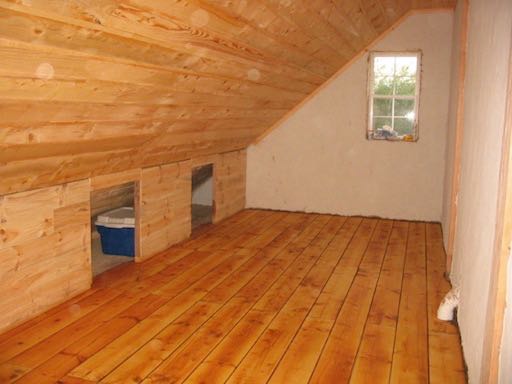
Loft bedroom (1 of 2).
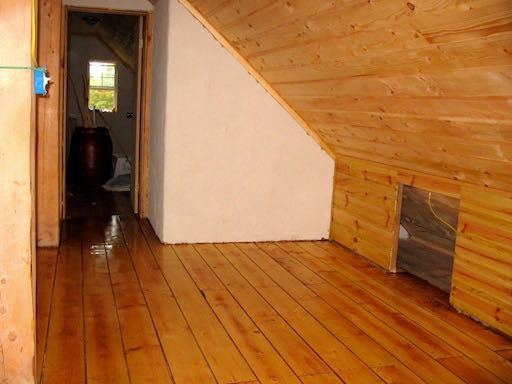
Activity room/loft over living room.
The cob mortar has held up very well through its first year, especially considering that it was left exposed without a roof for much of last summer, while it was still fresh. It wasn't our intention to do things that way, but it's how it worked out. Despite the abuse, the cob mortar showed very little wear. We patched shrinkage cracks with clay/sand/manure/hemp oil and then oiled the whole exterior this summer with hemp oil. A few logs were loose so we tightened them with shims and patched gaps as well. Adding hemp oil to the patch mix really makes the patches stick like glue. I have patched some floor with the same mix with great results as well.
Living room and loft view from front door. Earthen floor after 3 coats of hemp oil.
Wall above rocket stove.
Looking down at staircase from loft.
Looking down into living room from loft.
Earthen floor in master bedroom (4 coats of hemp oil applied, experimented with waterglass in this room as a precoat prior to oiling, will get one more coat of oil and one more oil/beeswax).
Loft bedroom (1 of 2).
Activity room/loft over living room.
Windows and Doors are In, Interior Walls Going Up
11/29/06 03:18 PM
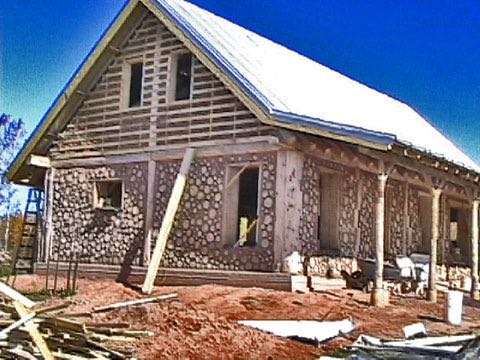
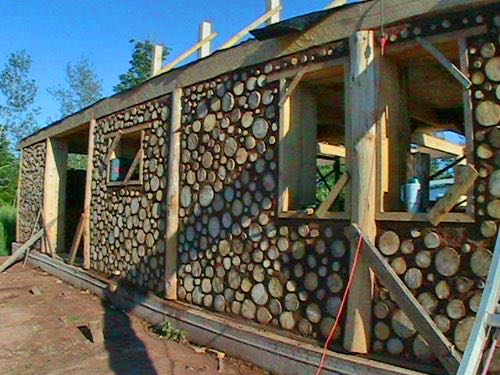
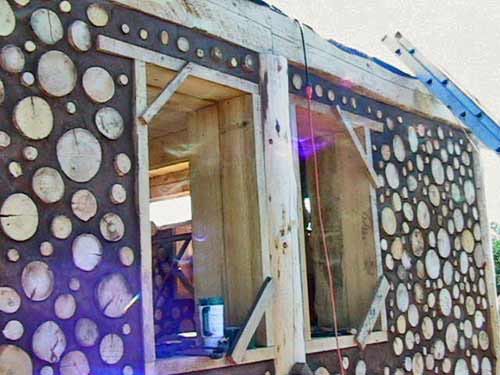
Here is the house from the outside on this beautiful, clear and 34 degree day.
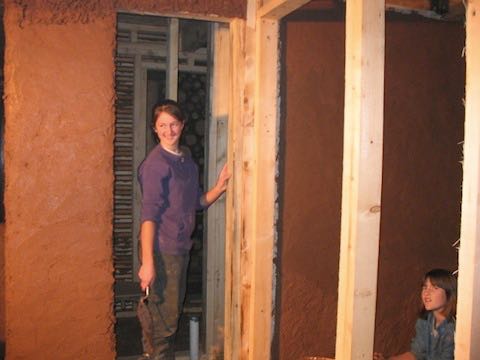
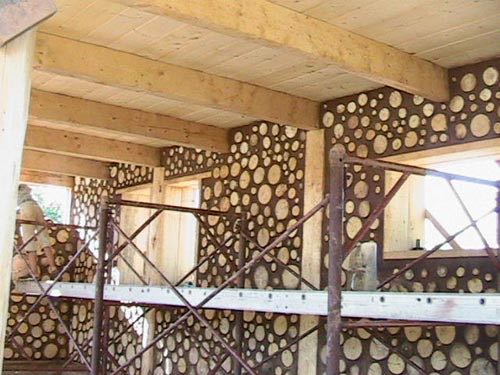
The interior is taking shape. The interior walls are slatted, then coated with a sticky clay/sand/chopped straw plaster.
Here is a close up of the first plaster layer.
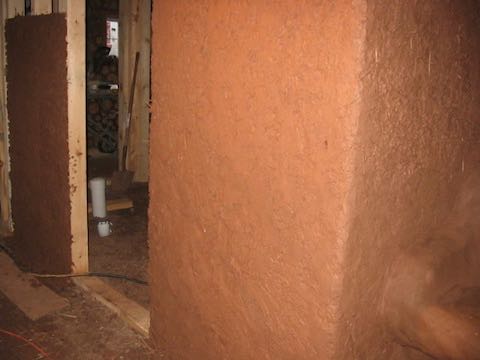
Then a smooth plaster is applied, made with sifted sand, clay slip, flour glue, EM ceramic powder and EM, and finely chopped dried manure, and troweled smooth. In this picture, the very top part of the wall has not yet been plastered with the finish plaster. The wall ends up with a very soft and pretty stucco look. There are a few options for finishing, and we will probably do some experimenting with different versions of natural paints and finish plasters.
The interior is taking shape. The interior walls are slatted, then coated with a sticky clay/sand/chopped straw plaster.
Here is a close up of the first plaster layer.
Then a smooth plaster is applied, made with sifted sand, clay slip, flour glue, EM ceramic powder and EM, and finely chopped dried manure, and troweled smooth. In this picture, the very top part of the wall has not yet been plastered with the finish plaster. The wall ends up with a very soft and pretty stucco look. There are a few options for finishing, and we will probably do some experimenting with different versions of natural paints and finish plasters.
Rocket Stove
11/29/06 01:50 PM
The past month was spent mainly on the construction of the Rocket Stove and the heated bench.
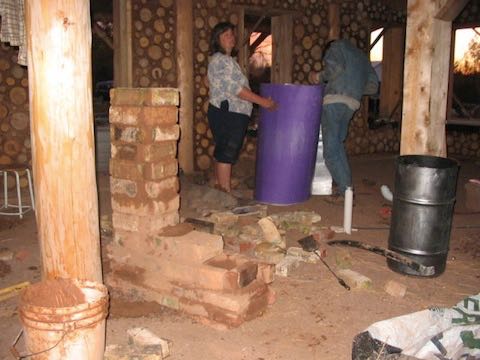
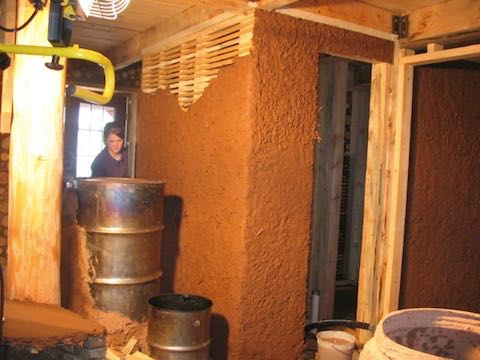
This first picture shows the brickwork that makes up the rocket stove. The wood gets fed into the shorter stack, on the right, which will be capped off with the silver barrel to the right. The flames angle towards the tall stack, called the heat riser, in the horizontal burn tunnel. The heat riser will be insulated with the piece of sheeting that Andrew and I are shaping (metallic printer's plate) filled with clay/sawdust. A large metal barrel is placed over that, with about 1-1/2 inch of gap around the perimeter for the hot air to travel down towards the flue.
Here is the insulation container in place and filled.
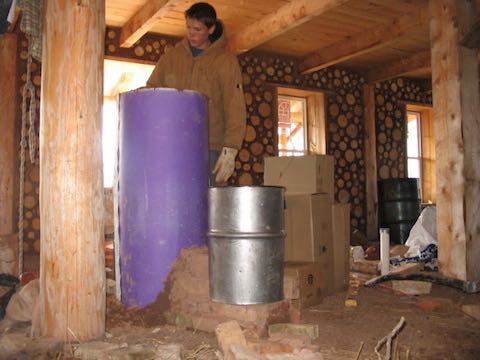
This picture is taken from the same angle as the above to show the finished rocket stove.
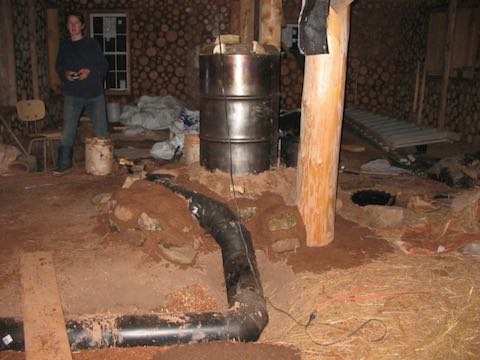
Here is the bench in progress, showing the layer of stones and the ductwork going through the bench and down into the floor. There is a clean out trap built in on the top left, which can be accessed from underneath the bench.
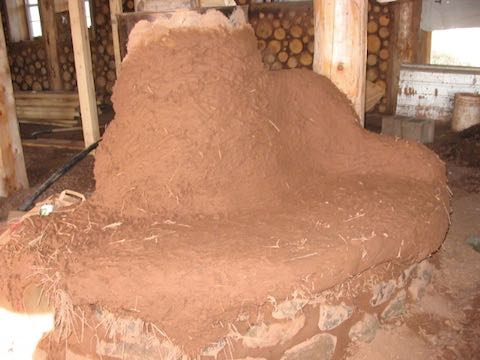
This picture shows the straw rich cob towards the outer layer.
Here is the bench with the finish plaster coat on.
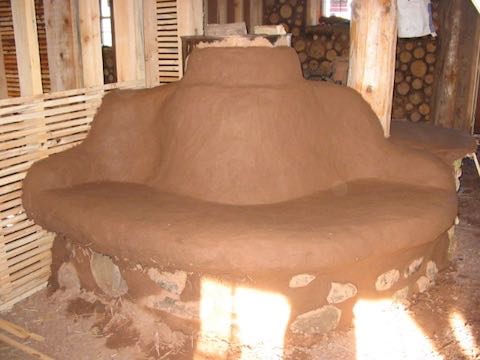
Here is the bench as it is today. The rocks will be cleaned and polished and the bench will get several coatings of hemp oil to shine, harden and waterproof it, plus some homemade cozy cushions.

This first picture shows the brickwork that makes up the rocket stove. The wood gets fed into the shorter stack, on the right, which will be capped off with the silver barrel to the right. The flames angle towards the tall stack, called the heat riser, in the horizontal burn tunnel. The heat riser will be insulated with the piece of sheeting that Andrew and I are shaping (metallic printer's plate) filled with clay/sawdust. A large metal barrel is placed over that, with about 1-1/2 inch of gap around the perimeter for the hot air to travel down towards the flue.
Here is the insulation container in place and filled.
This picture is taken from the same angle as the above to show the finished rocket stove.
Here is the bench in progress, showing the layer of stones and the ductwork going through the bench and down into the floor. There is a clean out trap built in on the top left, which can be accessed from underneath the bench.
This picture shows the straw rich cob towards the outer layer.
Here is the bench with the finish plaster coat on.
Here is the bench as it is today. The rocks will be cleaned and polished and the bench will get several coatings of hemp oil to shine, harden and waterproof it, plus some homemade cozy cushions.
The Gable Ends
10/17/06 07:02 PM
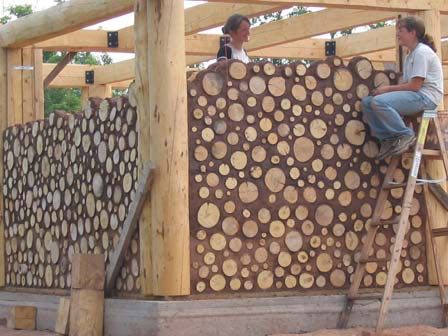
For the gable ends, we are using another natural building technique, where a lath is stuffed with straw that has been coated in a a clay slip (clay blended in water to make a thick, latex like liquid). This is what creates the insulation, and then the wall can be finished in any way desired, inside and out. Earthen plasters work exceptionally well, because they "grab on" to the straw and form an extremely strong bond.
We have finished stuffing one gable end, and just started on the other today. We plastered the inside of the one with 4 coats of earthen plaster. Our mix was similar to the mix that we used in the cordwood, only we used an extra part manure in place of the sawdust and doubled the flour glue, psyllium and kefir. The outside will be finished with cedar shakes next spring.
It's a pretty bad pic, but it's all we've got for now...
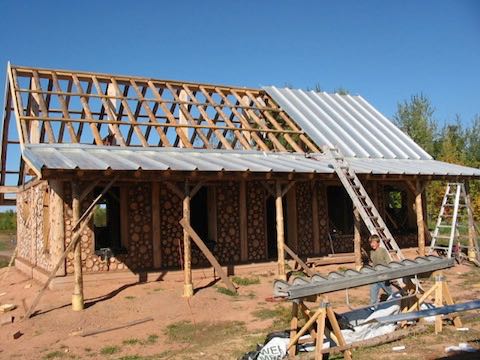
Metal roofing going on. Turned out to be a pretty straight roof for round poles, if I do say so myself.
We have finished stuffing one gable end, and just started on the other today. We plastered the inside of the one with 4 coats of earthen plaster. Our mix was similar to the mix that we used in the cordwood, only we used an extra part manure in place of the sawdust and doubled the flour glue, psyllium and kefir. The outside will be finished with cedar shakes next spring.
It's a pretty bad pic, but it's all we've got for now...
Metal roofing going on. Turned out to be a pretty straight roof for round poles, if I do say so myself.
Roof's Coming On Soon
08/30/06 06:31 PM
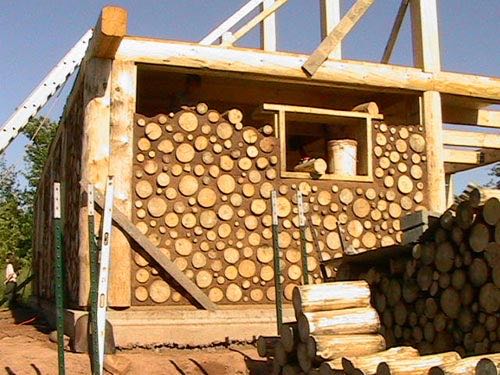
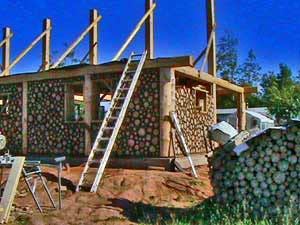
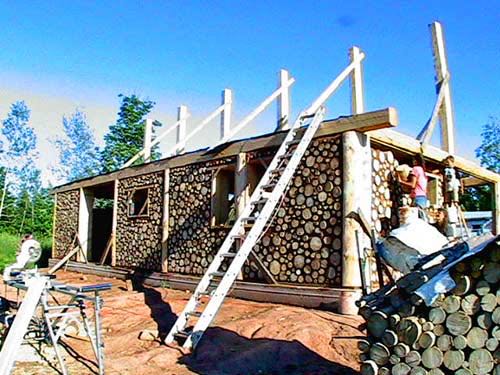
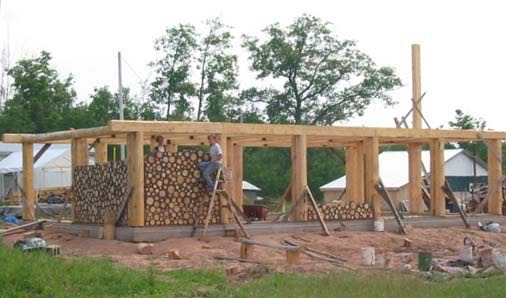
This is how the house looks as of yesterday. The metal roof is the next project for the guys. Mom and kids have just a few days left of the cob/cordwooding. We slowed way down this month as we need the guys to catch up a bit. Our next project is the floor, but we can't get going with that until the roof is on.
Here are the kids showing off the new kids. We had 3 goats kid. One had twin boys, but one of them never made it up. The others each had singles, one boy and one girl.
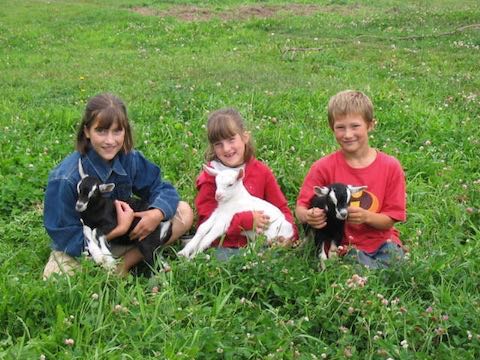
We got a real treat in witnessing the AWESOME birth of this little nanny goat. How's THAT for a science lesson??
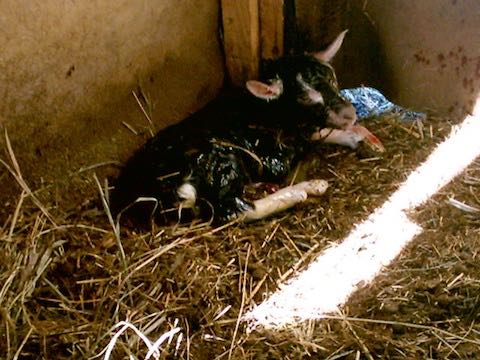
Here are the kids showing off the new kids. We had 3 goats kid. One had twin boys, but one of them never made it up. The others each had singles, one boy and one girl.
We got a real treat in witnessing the AWESOME birth of this little nanny goat. How's THAT for a science lesson??
Ridge Beams are Up!
08/03/06 07:08 AM
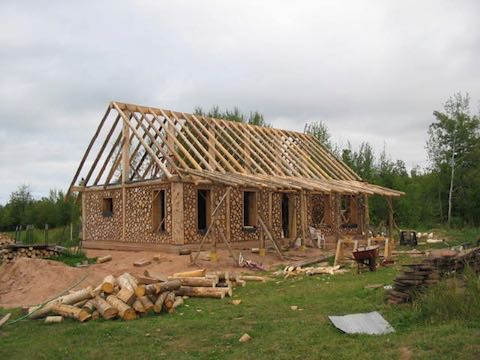
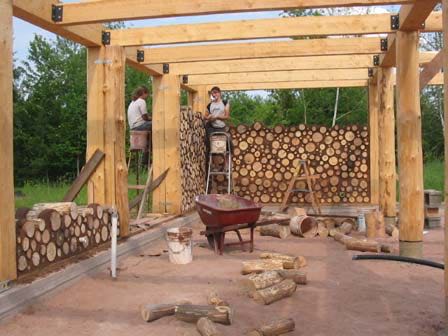
Andrew and Bill were a little giddy last night after having overcome probably the most daunting task of the house building process, hoisting the 8-10 ft. ridge beams to a height of 20 ft. in the air. They were able to manage by first bringing a borrowed scaffolding up into the loft, and working from that.
The cob/cordwood crew (Mom and kids) are working on the last full wall section while Dad and Andrew get the roof on. Once the roof is in place, then work can proceed on the floor, gable ends and roof insulation. All 3 of those areas will need a large amount of clay slip/sawdust.
The cob/cordwood crew (Mom and kids) are working on the last full wall section while Dad and Andrew get the roof on. Once the roof is in place, then work can proceed on the floor, gable ends and roof insulation. All 3 of those areas will need a large amount of clay slip/sawdust.
The Weather and Building
07/30/06 04:17 PM
It's 66 and rainy today... another BEAUTIFUL Sunday. After working hard outside all week long, the thing we like to do most on Sunday is nap, and there's nothing like a good, rainy all day Sunday to do that . We've had LOTS of rain lately. Praying like crazy that those walls don't come sliding down in a mudslide. The original plan was that the roof would be up BEFORE the cob/cordwooding, but the delay in getting the timbers due to the unusually warm winter (woods were too soggy to get logging trucks in) put us in a position that the walls needed to go up before the roof (in order to beat the frost, which is much more devastating to wet cob than rain). So, we are covering the tops of the walls as well as we can with plastic tarps. We're about 2 weeks behind our target date for getting the walls up, but the guys are a good month behind on the rest of the building.
Each day, we try to get 6 batches of cob mixed and built. That's enough to build up about 1/4 of an 8 foot wall section. We have changed our cob mix somewhat, so that each batch now contains 1 5 gallon bucket of clay (presoaked), 1 5 gallon bucket of horse manure (somewhat dried and run through a chipper/shredder), 1 5 gallon bucket sand, 1/3 5 gallon bucket fine sawdust, 1/3 c. psyllium powder, 1 tsp. EM ceramic, 1-1/2 c. flour glue, 2 T. rice bran oil, 1/4 c. buttermilk, 1 c. EM. I pre-mix the powders and liquids in 2-batch size containers for convenience.
This new mix has less sawdust and added oil and buttermilk. Cutting back the sawdust makes a prettier wall, but getting rid of it all together caused too much cracking, so we settled at 1/3 bucket instead of a whole bucket. The oil and buttermilk also make for a smoother, prettier wall, and help the water resistance of the wall.
Falling Behind Schedule
07/14/06 11:20 PM
Building with cob in the UP is just a little bit, shall we say, tense, as we know that these hot summer days can quickly turn to frosty nights and the cob has to be well dried by then, or it will puff up like pastry. We decided to alter our cob mix and removed the sawdust because it was slowing down the drying time. The new mix is prettier, points very nicely, but does have a tendency to crack. We may continue to experiment, adding just 1/2 the sawdust that we were using. We also found that collecting dry manure and shredding it the chipper/shredder is making an easier mix to work with.
We have temps near 100 today, but the work must go on as we have fallen behind schedule. The goal was to be done with the walls no later than August 1st, and it's looking like it will be 2 weeks later than that. The earthen floor takes a long time to cure, and then requires 7 coats of linseed oil and drying time between each. We may be living with a REAL dirt floor this first winter.
(No, the posts aren't made of rubber... The wide angle lens distorted the image a bit.)
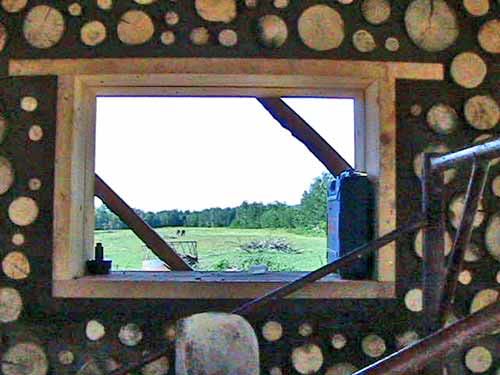
View out the kitchen window.

We have temps near 100 today, but the work must go on as we have fallen behind schedule. The goal was to be done with the walls no later than August 1st, and it's looking like it will be 2 weeks later than that. The earthen floor takes a long time to cure, and then requires 7 coats of linseed oil and drying time between each. We may be living with a REAL dirt floor this first winter.
(No, the posts aren't made of rubber... The wide angle lens distorted the image a bit.)
View out the kitchen window.
Cobbing Away
06/27/06 03:20 PM
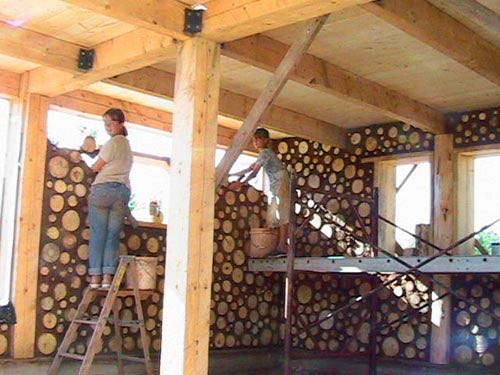
Building up the cordwood walls with a cob mixture has been a very rewarding and pleasant summer work experience for the family. We chose this method of building because it would allow the entire family to be involved. There are many hours of labor needed, but that labor is not intensive, and even 3 year old Johnny can help out now and again.
We try to mix and build 6 batches of cob each day. Each batch consists of 5 gallons clay soaked in water, 5 gallons sawdust, 5 gallons dry manure, 5 gallons sand, 2-1/3 c. flour glue/EM, 1/3 c. psyllium powder, and 1 tsp. EM ceramic powder. 1-2 gallons of water are added as well. We have shallow dishes dug in the ground where we lay 8x10 tarps and mix the ingredients. The manure and clay get set up to soak for a little while before mixing. The mixing is done by stomping with bare feet, like treading grapes, and lifting the tarp to mix in the ingredients. It takes about 10-15 minutes to mix a batch.
We try to mix and build 6 batches of cob each day. Each batch consists of 5 gallons clay soaked in water, 5 gallons sawdust, 5 gallons dry manure, 5 gallons sand, 2-1/3 c. flour glue/EM, 1/3 c. psyllium powder, and 1 tsp. EM ceramic powder. 1-2 gallons of water are added as well. We have shallow dishes dug in the ground where we lay 8x10 tarps and mix the ingredients. The manure and clay get set up to soak for a little while before mixing. The mixing is done by stomping with bare feet, like treading grapes, and lifting the tarp to mix in the ingredients. It takes about 10-15 minutes to mix a batch.
Cordwood/Cob update
06/16/06 06:09 PM
Progress Report
03/24/06 04:17 PM
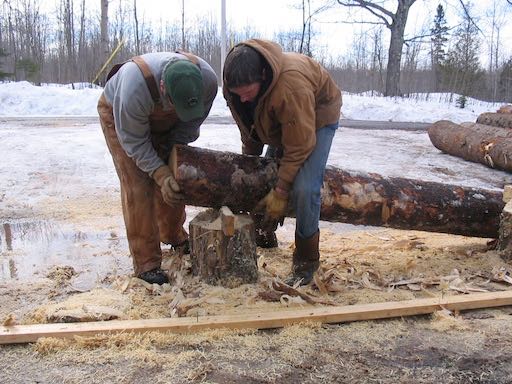
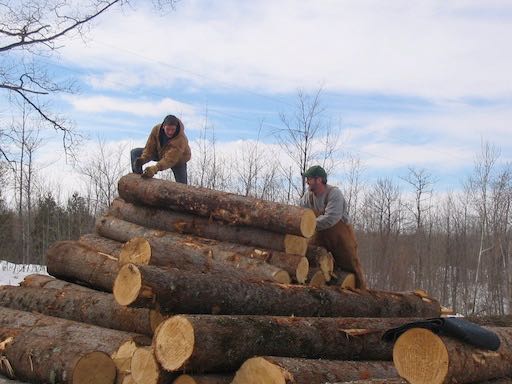
The guys are using the alaskan chain saw method to cut the timbers for the house. They are getting close to being half way done... probably 2 or 3 more weeks to go depending on how many "interruptions" there are. The "interruptions" include cutting wood (we didn't have a chance to put wood up for this year, so we need to gather dead wood as needed), getting hay to the animals (the round bales froze to the ground, it takes 3 or 4 of us to loosen them and push them over to the horses or cows.. a morning's job), getting the maple trees tapped, fixing fences (never ending chore on a homestead), and whatever I need strong arms for.
We are just starting some indoor seeds, and getting the fruit and nut tree seeds stratified. That means chilling them in moist sawdust for a couple of months before planting. Each has its own set of instructions, and I have 23 varieties that I've ordered.. sorting it all out.
The girls have been playing with the ponies and mules daily. They are taking them for walks and getting them used to the saddle and scary things. Some of the kids have been up on one of the mules and one of the ponies. They are getting used to having their feet handled, and I have started trimming (finally uncovered my trimming tools). We are also learning to make horsehair rope.
Basic Cordwood House Plans
02/24/06 03:50 PM
Our house design is coming along. Slowly, but steadily..
So far, our plan calls for a post and beam frame to support the roof. The cordwood infill will not be load bearing. (For more info on cordwood, check out DayCreek, it is an excellent website with tons of info and a discussion forum to boot.) The finished house with the loft will be nearly 1500 square feet. Below are the basic layout plans. Everything is still in the pre-production stage and subject to change, but we like this design a lot so hopefully no updates should be too major from this point on.
First Floor Plan:
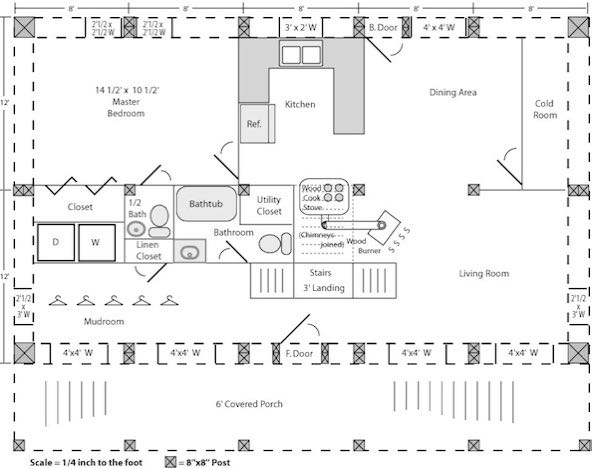
Something to point out is the location of our wood cookstove v.s. the utility closet v.s. the bathtub.. It is a strategic setup in anticipation of heating our hot water in a boiler using the stove.
Loft Plan:
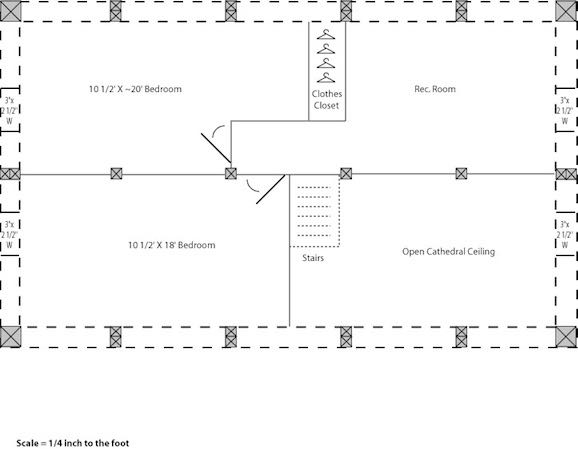
One thing to note is that we will not be using 16''x16'' posts in the corners as the plans indicate. Instead we have opted for a method of doing the corners that don't require such massive timbers. You will see more clearly how this will work in the following 3D renderings that I have sketched of the timber frame below.
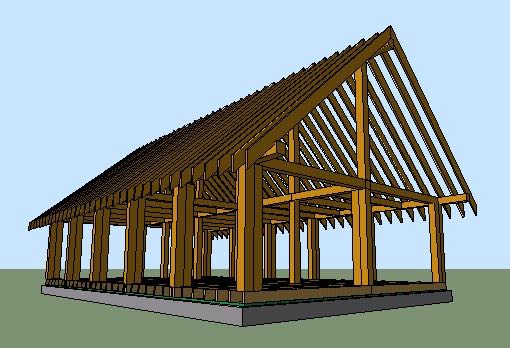
Frame Overview: (The front porch is not shown)
The cordwood is worked up first on the front and back walls, and then the side walls can be built up to them in the corners, like this:
[X][X] | | | | |
-------- | | | | |
--------
--------
Window and door frames will be free-floating in the cordwood infill. All posts and beams are 8''x8''s, except for the roof ridge beam and main roof girders. These will be 8''x10''s to accommodate the heavier load of the roof.
Post Detail:
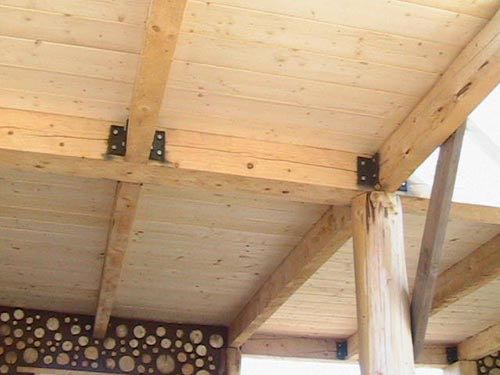
The 8''x8'' posts are doubled to provide a good surface to build the cordwood up to. You can see the extra support under the posts, as well as the treated sill plate that rests on our foundation.
Roof and Gable:
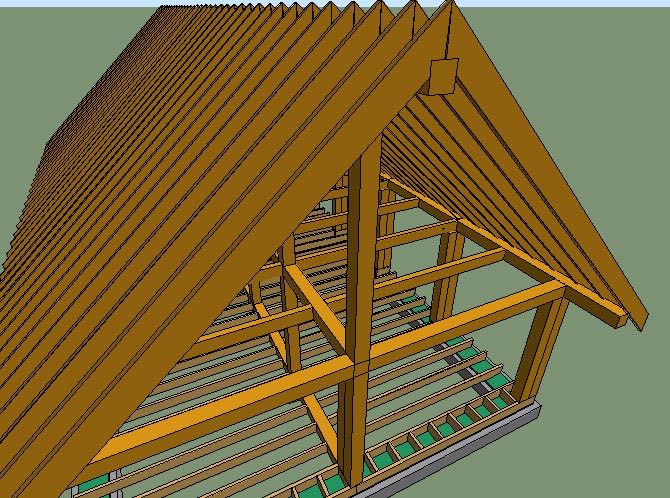
Rafters are 2''x10''s spaced 16'' oc. The height of the loft at the center is 10'. (Yes, that is an 8''x8'' ridge beam that is pictured... The model has been updated with an 8''x10'', but these pics were most convenient at the time.) Note the extra framing in the floor next to the rim joist to provide good bearing for the heavy cordwood wall.
Loft Detail:
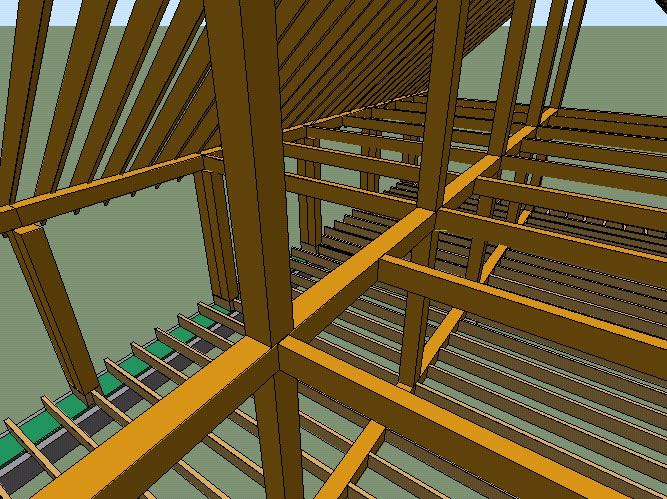
Here is a view looking down at the living room from the open loft. The bedrooms will be on either side of the peak, at the far end of the house. Loft joists are 4''x8''s spaced 4' oc.
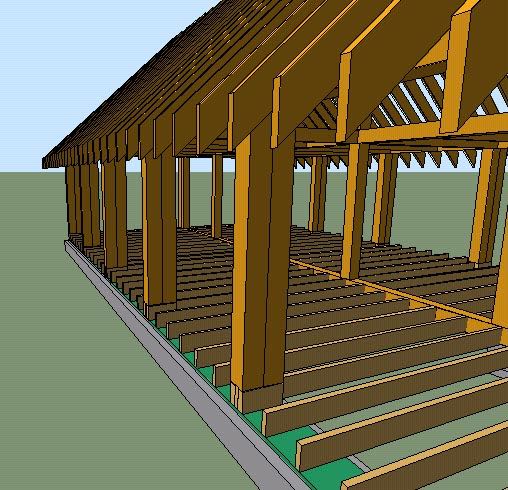
Lower View:
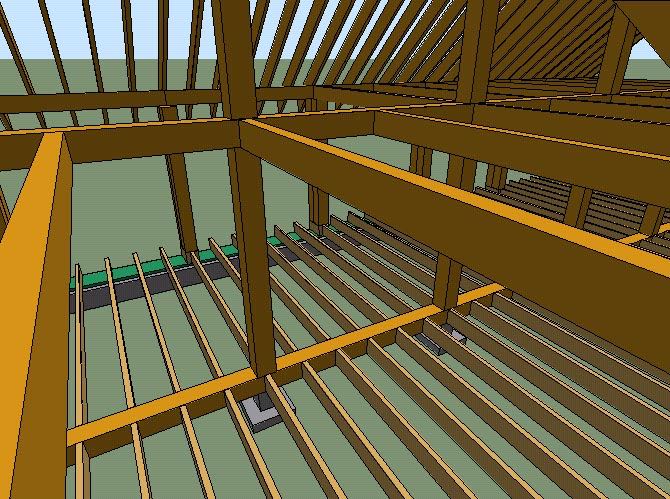
You can see the piers under the floor in this view. The floor joists are 2''x8''s spaced 16'' oc and are double under walls and other points of added stress.
That's it! The beauty of 3D rendering is that you can take any picture you want from any viewpoint, and I think I covered all the main points of interest...
Andrew
So far, our plan calls for a post and beam frame to support the roof. The cordwood infill will not be load bearing. (For more info on cordwood, check out DayCreek, it is an excellent website with tons of info and a discussion forum to boot.) The finished house with the loft will be nearly 1500 square feet. Below are the basic layout plans. Everything is still in the pre-production stage and subject to change, but we like this design a lot so hopefully no updates should be too major from this point on.
First Floor Plan:
Something to point out is the location of our wood cookstove v.s. the utility closet v.s. the bathtub.. It is a strategic setup in anticipation of heating our hot water in a boiler using the stove.
Loft Plan:
One thing to note is that we will not be using 16''x16'' posts in the corners as the plans indicate. Instead we have opted for a method of doing the corners that don't require such massive timbers. You will see more clearly how this will work in the following 3D renderings that I have sketched of the timber frame below.
Frame Overview: (The front porch is not shown)
The cordwood is worked up first on the front and back walls, and then the side walls can be built up to them in the corners, like this:
[X][X] | | | | |
-------- | | | | |
--------
--------
Window and door frames will be free-floating in the cordwood infill. All posts and beams are 8''x8''s, except for the roof ridge beam and main roof girders. These will be 8''x10''s to accommodate the heavier load of the roof.
Post Detail:
The 8''x8'' posts are doubled to provide a good surface to build the cordwood up to. You can see the extra support under the posts, as well as the treated sill plate that rests on our foundation.
Roof and Gable:
Rafters are 2''x10''s spaced 16'' oc. The height of the loft at the center is 10'. (Yes, that is an 8''x8'' ridge beam that is pictured... The model has been updated with an 8''x10'', but these pics were most convenient at the time.) Note the extra framing in the floor next to the rim joist to provide good bearing for the heavy cordwood wall.
Loft Detail:
Here is a view looking down at the living room from the open loft. The bedrooms will be on either side of the peak, at the far end of the house. Loft joists are 4''x8''s spaced 4' oc.
Lower View:
You can see the piers under the floor in this view. The floor joists are 2''x8''s spaced 16'' oc and are double under walls and other points of added stress.
That's it! The beauty of 3D rendering is that you can take any picture you want from any viewpoint, and I think I covered all the main points of interest...
Andrew